Recently I had a client ask to take submissions from a formsite.com form into their Insight.ly account as soon as submitted from their WordPress site. This was no easy task as formsite uses javascript embedded code to generate an iframe and load the form. I pulled it off by interfacing both the formsite api and the insightly api on a thank you page redirect from formsite but it was gross code and had a moderate failure rate at importing correctly.
Remove The Middle Man
Don’t let its modern, sexy homepage fool you, Formsite is pretty archaic in methods and form generation. It’s a sad case a site and tool so large can be so crappy. I needed to just build a form that shot the info over to insightly while also looking nice and sending an email to the site owner.
I’ve done some work for Caldera and I can honestly say they have the best, easiest to use and easiest to extend form building system for WordPress… bar none. They also look gorgeous. The drag and drop interface is beautiful and works flawlessly. The options and extensions vary from simple needs to extremely complex ones. What we are going to build here is somewhere in between.
Extending Caldera Forms
First build a form. The Insightly API has some requirements but they are not documented well. From trial and error I believe first name, last name and email are the main requirements… maybe phone. So create a simple form in Caldera with these and whatever else you need then let’s move on.
Add the official Caldera plugin Caldera Forms Run Action to your WordPress installation. This plugin allows you to to hook into the form data being processed before, during and after the processing. Before we start writing code, let’s set that up on our form.
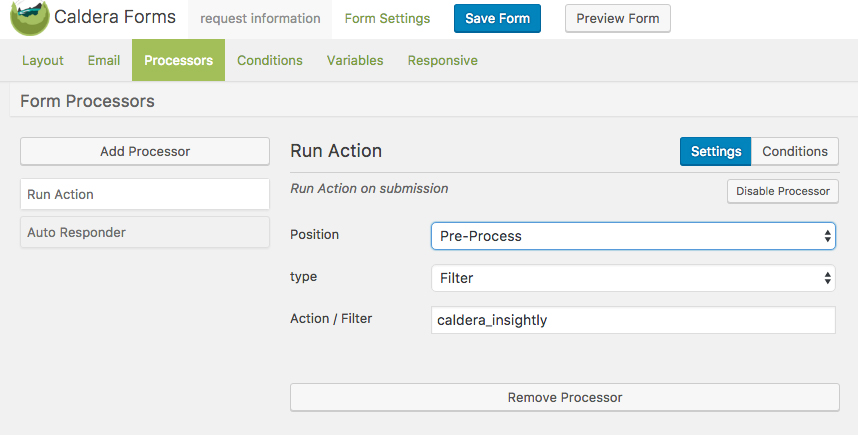
Go to the “Processing” tab on the form editing page, add a processor of type “Run Action” and fill in details like this. You can use a different name for your filter/hook but just remember it when we start coding.
We are saying we want to do some stuff with the form data after the user submits but BEFORE it gets processed. This way if we have any trouble with the insightly api we can let the user know so they can fix their input.
Hooking Into Caldera
To do this, you need to put some code into WordPress. You can do this in your theme’s functions.php file but I recommend you create a very small plugin. To create this plugin you will add a folder to your wp-content/plugins directory called caldera-insightly. Inside that folder you will create a php file named caldera-insightly.php. That file will look like the below code. Don’t forget to go to “Plugins” in your admin and activate it.
This code is BARE BONES. I did not build this out like a big proper plugin but it’s simple in its functions and will work for the basics of interfacing the insightly API v2.2. I explain the code below.
https://gist.github.com/ChrisFlannagan/d5e25d6c03ddef5ed92f3d99501be99b
The add_filter line is where we put in the hook that we registered on the Run Action processor on our caldera form. The second parameter ‘process_insightly_data’ tells it what function to perform on the data from the form. Remember this is all happening before Caldera processes the data so if we return anything at all from this function the processing fails and the user gets an error message.
$form_data[‘first_name’] is referencing the “slug” of the form field. You can see this when building your form in caldera. Each field input has a slug that is sent as the form data.
Insightly requires the data to be formatted in JSON with very specific keys. You can see a list of options here. The FIRST_NAME, LAST_NAME and so on are very straight forward. The complicated shit happens when you hit the LEAD_SOURCE or want to do CUSTOM_FIELDS. I’ve had a time and a half working with custom fields and got it to work once, so I just avoid it now if I can. The lead source requires you to already have lead sources setup in insightly. You need to get the ID’s of those sources and use them to create your lead source array.
Lead source is not required so you can delete that whole section if you want.
After building our array of data we json_encode it and send it on its merry way. Don’t forget to grab your API key and replace it in this code. To get that code once logged into insightly click your profile picture in the top right corner then hit User Settings. Scroll down on that page and you will see API KEY at the bottom.
I detect for “LEAD_ID” in the return string as this means a new lead was created and assigned an ID. If it’s not there then we return that an error has occurred. This could be handled better but I was in a hurry as the client wasn’t paying for a lot of hours.


Hi Chris,
I was stoked to find this post. This is exactly what I need to accomplish for my own site.
I followed your instructions to the letter.
Nothing…..
No lead created in Insightly. No error message. Just nothing.
I removed the lead source stuff. I double-checked my slugs. I triple checked my API ID. Everything is EXACTLY as you laid out.
Any thoughts? Are you certain this code still works (as in did Insightly change anything recently)?
Any help you could give would be much appreciated.
Hi Ron, I don’t believe I made many, if any real changes. It still works for us. I’d be happy to look at your code/error logs to try and solve what could be the issue so I could spruce this post up to be more information though.
I just updated the gist to latest code I’m using, not sure if it’s different or not didn’t have time to compare.
Chris