Version 16.1 of WordPress PHP Info Released

I adopted this plugin a while back from a friend. It was closing in on 10,000 active installs and I thought might be fun to tinker with.  The code was pretty sloppy as it was from his younger days and he didn’t feel like maintaining it.

I took it over and didn’t do much with it.  I added a pretty crappy email the php info feature that didn’t really work well at all.  Still, people needed it and it was a first mover so it’s the go to phpinfo() plugin for people.

It hit 20,000 active installs just a few days ago.  Well I decided to spice it up a bit.  Over the past few evenings I rewrote it from scratch with much better code and WordPress standards.  I cleaned up the interface to be much nicer and fine tuned the email info feature to include multiple addresses and work securely.

Check it out here: https://wordpress.org/plugins/wordpress-php-info/

Building a Payment Gateway for Give WP the Donation Plugin for WordPress

My father runs a non-profit organization and I told him I’d help with some of his online needs.  I’m in the midst of a task for him where I need a very simple, but precise method of donations through Stripe.  While the Stripe Add-On for Give is excellent, it’s more than I need and missing some small features my project requires.  I’m not going to get into that specific project but show you what I’ve learned.

Unless I’m missing something obvious on their site and with some quick googling, there’s no documentation for building Give gateways. I had to reverse engineer a couple that are available to see what is necessary to make it work.  Here it is in its simplest form.

Bare Bones Gateway

When building an extension for a plugin I like to try and build the absolute barest possible version.  What you see at the bottom of this section is just that.  We use just two hooks:

  • add_filter( ‘give_payment_gateways’ )
  • add_action( ‘give_gateway_{gateway_slug}’ )

The filter registers our gateway.  This will then show our gateway as an option in the Give gateway settings.

The action is where we process the submitted form data.  It’s pretty straight forward, the function has a single parameter ($purchase_data) passed to it which contains all data submitted and generated by Give that’s needed to process a donation.

The $payment_data array is created and built to hold all the necessary items for processing a transaction and recording it.  Then we simply call the Give function give_insert_payment( $payment_data).

https://gist.github.com/ChrisFlannagan/e214d5df8843e9125df14501907405b8

Settings

The next feature you will probably want to add is the admin settings for your plugin.  This will allow your users to set api keys and other various options you’d like to have.  You can see a good example of establishing settings here:

https://github.com/WordImpress/Give/blob/master/includes/gateways/offline-donations.php#L281

Pending Status

I tried using ‘publish’ instead of ‘pending’ in the payment data but this caused some php warnings to pop up.  Even though the donation went through, the results were ugly and obviously not to spec with the Give plugin’s functionality.  So after checking if the payment is valid simply run the give_update_payment_status function.  Or, if you need to verify the payment through your payment processor you can have  a separate function that handles this.

Fleshing It Out

This, as stated, is a completely bare bones gateway that does nothing but record a donation.  give_gateway_{plugin_slug} action is a blank canvas for handling processing.  You can do your own verifications, reach out to your processor, manage the response and more.  I would suggest looking at the Give plugin directory give/includes/gateways files offline-donations.php and paypal-standard.php and check out the different hooks and functions you can use to expand your gateway’s user experience and capabilities.

The Give plugin is very powerful and very extendable.

Import Leads From WordPress to Insightly with Caldera Forms & Insight.ly API v2.2

Recently I had a client ask to take submissions from a formsite.com form into their Insight.ly account as soon as submitted from their WordPress site.  This was no easy task as formsite uses javascript embedded code to generate an iframe and load the form.  I pulled it off by interfacing both the formsite api and the insightly api on a thank you page redirect from formsite but it was gross code and had a moderate failure rate at importing correctly.

Remove The Middle Man

Don’t let its modern, sexy homepage fool you, Formsite is pretty archaic in methods and form generation.  It’s a sad case a site and tool so large can be so crappy.  I needed to just build a form that shot the info over to insightly while also looking nice and sending an email to the site owner.

I’ve done some work for Caldera and I can honestly say they have the best, easiest to use and easiest to extend form building system for WordPress… bar none.  They also look gorgeous.  The drag and drop interface is beautiful and works flawlessly.  The options and extensions vary from simple needs to extremely complex ones.  What we are going to build here is somewhere in between.

Extending Caldera Forms

First build a form.  The Insightly API has some requirements but they are not documented well.  From trial and error I believe first name, last name and email are the main requirements… maybe phone.  So create a simple form in Caldera with these and whatever else you need then let’s move on.

Add the official Caldera plugin Caldera Forms Run Action to your WordPress installation.  This plugin allows you to to hook into the form data being processed before, during and after the processing.  Before we start writing code, let’s set that up on our form.

Go to the “Processing” tab on the form editing page, add a processor of type “Run Action” and fill in details like this.  You can use a different name for your filter/hook but just remember it when we start coding.

Run Action Processor Settings

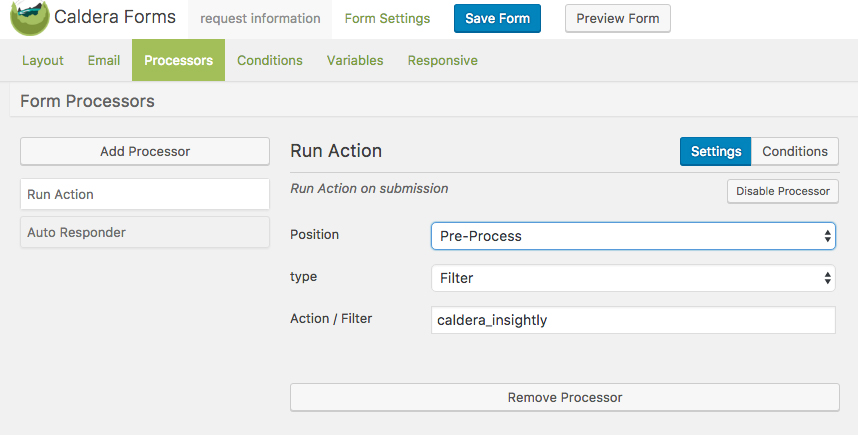
We are saying we want to do some stuff with the form data after the user submits but BEFORE it gets processed.  This way if we have any trouble with the insightly api we can let the user know so they can fix their input.

Hooking Into Caldera

To do this, you need to put some code into WordPress.  You can do this in your theme’s functions.php file but I recommend you create a very small plugin.  To create this plugin you will add a folder to your wp-content/plugins directory called caldera-insightly.  Inside that folder you will create a php file named caldera-insightly.php.  That file will look like the below code.  Don’t forget to go to “Plugins” in your admin and activate it.

This code is BARE BONES.  I did not build this out like a big proper plugin but it’s simple in its functions and will work for the basics of interfacing the insightly API v2.2.  I explain the code below.

https://gist.github.com/ChrisFlannagan/d5e25d6c03ddef5ed92f3d99501be99b

The add_filter line is where we put in the hook that we registered on the Run Action processor on our caldera form.  The second parameter ‘process_insightly_data’ tells it what function to perform on the data from the form.  Remember this is all happening before Caldera processes the data so if we return anything at all from this function the processing fails and the user gets an error message.

$form_data[‘first_name’] is referencing the “slug” of the form field.  You can see this when building your form in caldera.  Each field input has a slug that is sent as the form data.

Insightly requires the data to be formatted in JSON with very specific keys.  You can see a list of options here.  The FIRST_NAME, LAST_NAME and so on are very straight forward.  The complicated shit happens when you hit the LEAD_SOURCE or want to do CUSTOM_FIELDS.  I’ve had a time and a half working with custom fields and got it to work once, so I just avoid it now if I can.  The lead source requires you to already have lead sources setup in insightly.  You need to get the ID’s of those sources and use them to create your lead source array.

Lead source is not required so you can delete that whole section if you want.

After building our array of data we json_encode it and send it on its merry way.  Don’t forget to grab your API key and replace it in this code.  To get that code once logged into insightly click your profile picture in the top right corner then hit User Settings.  Scroll down on that page and you will see API KEY at the bottom.

I detect for “LEAD_ID” in the return string as this means a new lead was created and assigned an ID.  If it’s not there then we return that an error has occurred.  This could be handled better but I was in a hurry as the client wasn’t paying for a lot of hours.

WooCommerce Buy One Get One Half Off (50% Off) Hook/Plugin – IN PROGRESS

We have a deal coming up for all of November at my work.  Buy one, get one half off.  There’s no way to do this in vanilla WooCommerce.  I looked at Dynamic Pricing and it didn’t seem to offer this ability and if it did it was crazy complicated.  I looked at some other plugins out there and found one that may work but it was pro version only and I didn’t want to pay to find out.

I figured this is pretty straight forward need so why not write up a function real fast.  Here’s my train of thought followed by a code example.  This is only a proof of concept and I still need to add – price limits (items must be over a certain price for this to work), category limits and the ability to apply this more than once to an order.  But as of now it will take the second highest priced item and give it a 50% discount.  If you have two of the same item as the highest price it will discount the amount to make it the same as taking 50% off just one of the items.

First we need to hook into woocommerce_before_calculate_totals.  This way we can change the price on the cart and on the checkout.

add_action( 'woocommerce_before_calculate_totals', 'add_custom_price' );
function add_custom_price( $cart_object ) {

Then I set variables for highest price, quantity of that item, a counter so we know if the shopper has more than 1 item in our discount range (for future use with pricing bottoms) and next highest price item.

$highest_price_id = 0;
$highest_price_quantity = 0;
$cnt = 0;
$highest_price = 0;
$next_highest_price_id = 0;
$next_highest_price = 0;

I need to optimize this, there should be no need for looping the cart twice but in a hurry to prove the concept works this morning and get something ready for our promo I did it this way.  I loop through the cart and gather all my data: highest priced item, quantity and so on.  Then we loop the contents again and reduce price where needed.

foreach ( $cart_object->cart_contents as $key => $value ) {
   if( $value['data']->price > $highest_price ) {
      $highest_price = $value['data']->price;
      $highest_price_id = $value['product_id'];
      $highest_price_quantity = $value['quantity'];
      $cnt++;
   }

   if( $value['data']->price < $highest_price && $value['data']->price > $next_highest_price ) {
      $next_highest_price = $value['data']->price;
      $next_highest_price_id = $value['product_id'];
      $cnt++;
   }
}

The final loop we first check if:

  1. Highest priced item is more than 1 quantity and we are on it in the loop
  2. There’s no other item that’s considered the second highest price.  If there is, we want to discount that and not one of the highest priced items.
  3. If any of that fails then we check if this is the next highest priced item and run our discount here
foreach ( $cart_object->cart_contents as $key => $value ) {
   if ( $highest_price_quantity > 1 && $value['product_id'] === $highest_price_id && $next_highest_price === 0 ) {
      $value['data']->price = $value['data']->price - ( $value['data']->price / $value['quantity'] ) * .5;
   } elseif ( $value['product_id'] === $next_highest_price_id && $cnt > 1 ) {
      $value['data']->price = $value['data']->price - ( $value['data']->price / $value['quantity'] ) * .5;
   }
}

The discount is based on quantity.  If someone has two of the same $99 item we don’t want to make them both $48.  We want to discount just the first item but I’m not sure if that’s even doable.  We could generate a coupon or some other more complicated options but I went with the simple approach.  Let’s take the quantity, divide the price by that (so we have two $99 items, 99/2 is $48) then take 50% of that and subtract it from the price.  Each item will have 25% subtracted basically and add up to 50% total discount on 2 items.

I’ve been testing this and it seems to be working.  I JUST put this together though so needs a lot more testing to make sure it’s working correctly.

https://gist.github.com/ChrisFlannagan/0d2010c49f582d5d89fa6f9740bf5703

Tracking Conversions in WooCommerce with Simple Link Codes the Easy Way & More

woocommerce-tracking-code-plugin-simpleI wrote about this as I was building it out.  It’s evolved a bit and is now on the WordPress Plugin Repository.

https://wordpress.org/plugins/quick-tracking-conversions-for-woocommerce/

It’s simple.  You setup codes you want to track for conversions in WooCommerce.  If you have an email blast coming up then just create a code for it and attach that code to the end of all links in the email blast.  This works for affiliates, whatever.

The link looks like this: https://whoischris.com/?qtc_woo_tracking_code=testcode

Of course you can replace “testcode” with anything you want and have as many tracking codes as you’d like.  Then in the admin, you input the code you want to see the results of.  You get a total and # of conversions.  I have every intention of adding more in depth analytics but this is a proof of concept.

Passwords to Conversions Analytics

What I encountered the following week at work presented a new problem.  We are starting a site for retailers and professionals in our industry.  We sell a specialized tool only to licensed professionals and we want them to be able to carry our consumer product on their shelves, so they need to be able to buy at a discounted, bulk price.

Fortunately this site is on its own domain and I can make the functionality global.  So here’s what I needed to happen:

  • All shopping functionality should be hidden behind a password/access code that we hand out.
  • Different rep groups selling to professionals need to have their own code that can be tracked
  • We want to see total conversion for each code used

My thoughts lead to why not use the existing conversions plugin I built?  I’ll just hide all of WooCommerce behind a password wall.  Any password the admin creates can be used to access it, I just drop a cookie.

I also drop a cookie for the Quick Tracking Conversions plugin and voila, our shoppers have access and we can see what password/access code they are using to make their purchase.  The new extension can be found here:

https://github.com/ChrisFlannagan/qtc-passwords


Beatrix Has A YouTube Channel Now

My daughter watches these crazy videos where it’s just someone opening up toys, or pulling them out of play dough, or little toy surprises out of plastic eggs.  It’s the weirdest thing.  Apparently kids can watch these for hours as they have millions and millions of views.  Anyway, she asked me if she could make some so why not!  Here’s her first too:

https://www.youtube.com/watch?v=w8V86imzS2I

https://www.youtube.com/watch?v=CejT6PqBYGk


Animate Image Or View Circular Motion In NativeScript

quick-demo.mov video file

I haven’t taken calculus in years and I haven’t needed it since college.  But today I did.  I needed to animate an object going in a circular motion over a graphic of a face in an iPhone/iOS app I’m developing.  These examples are purely wire framed with no official graphics or design.

What You Need

  • An AbsoluteLayout view
  • An Image view (or whatever you’d like really) inside that AbsoluteLayout
  • A starting x and y coordinate which will be the center of your circular path
  • Radius of the circle you want for your path
  • Angle (or animation speed)

Layout


We are going to build our layout dynamically.  I found this to be the best method for sizing things and positioning our elements.  Let’s take a look at that code.

First we need some xml to hold our generated layout items.  A simple stack layout works here, I use the horizonalAlignment and verticalAlignment to fill up the screen.  Well, it’s supposed to but doesn’t seem to function just right depending on the xml around it.  Still, it will work well enough for our demo here.

<StackLayout id="main-layout" orientation="vertical"
      horizotnalAlignment="stretch" veritcalAlignment="stretch">
</StackLayout>

Let’s fill that with some elements we want for our circular animation.  I’ve loaded this example code up with comments to explain what’s happening but I’ll point some important bits after this code block.

https://gist.github.com/ChrisFlannagan/56c55de015c0ee55b9310d3b542ac8a4

So our angle variable in combination with our duration speed is what controls the speed of our animation.  Each “frame” is 1000 milliseconds which is set at the very end of the setInterval function’s code block, the second parameter.

Our call to .animate() has duration: 1000 ms as well so the time it will take to transition to the next point on the circle is also 1 second.  If you think about this that means it’s going to move in a straight line from one point on the circle to the next as in this graph below.  Within 1 second, before the next frame’s location on the circle path is calculated, it animates the transition between points.

Imagine the little red circles are the calculated points transitioned to every 1 second of setInterval().  Our object moves in a straight line between them over the course of that one second.

circle-animation-lines

Starting Coordinates

The oddest problem I encountered was that my animated object shot to the outer radius of the circle from the center of it before starting reach the initial calculated frame.  What was happening is that the object is animated to it’s next frame based on it’s original x and y position.  So each calculation is based on that.  Since I start at a 0 degree angle the y axis doesn’t change when it starts but the x axis does.

I tried changing the xOrigin property to 50 (the radius) less than where I plotted it in hopes this would allow all future transition calculations to be based on that and it would seamlessly animate from the beginning but that didn’t seem to work.  So you can see in the code my solution is to subtract 50 from the x when calculated and it gives a calculation like the xOrigin is 50 less.  This seems to work just fine.

Adding Controls

In my project I have a start and stop button.  It also has a timer countdown which is not complete yet so the code isn’t going to do anything when the timer runs out.  You can see it in the main video above. I’ll post that full code below so maybe you can use some of the functionality.  It’s not commented as cleanly but notice in the xml that there are start and stop buttons with “tap” parameter which calls the respective functions in our .js file.

https://gist.github.com/ChrisFlannagan/3e74f87b5769b1f00f4f48f28faf3107

And the javascript

https://gist.github.com/ChrisFlannagan/b1e8c803fa3136e26bfca406ab5c35e8


Use NativeScript Plugin nativescript-background-http To Send And Store Camera Pictures On PHP Server

I searched and searched and asked on slack and asked on the NS FaceBook group and everything I could think of to figure this out.  I finally pieced it together and it’s working.  So do you want to let your app users take a picture with their camera, or use one in their library for something and you need that photo stored on your web server? We let users take before/progress/after pics from using our device.  We want to store these photos so we can see results ourselves and request use from our users for advertisements.  So here’s how you do it.

nativescript-background-http

You need to make sure and import your camera ui and also this plugin.  It’s extremely awesome and works great.  You can get it by running

tns plugin add nativescript-background-http

EDIT: For some reason when I put this on an actual device it wouldn’t save the photos.  When on the actual phone it has a problem with using knownFolders.currentApp() and a custom folder, so I change that line from

fs.knownFolders.currentApp().path + /saved_images;

to

fs.knownFolders.documents().path;

and it worked just fine.

After setting that up use the below code, or whatever parts of it you’d like, to make the NS function and push the upload to your server.  A couple notes though, I use a folder called /saved_images in my /app project directory to store the files before sending.  I’m not sure this is necessary but I wanted to resize to a maximum of 800px wide or height while retaining proportion.  It is extremely important this directory is created if you use this filepath or your script will fail and you won’t know why because error logging here doesn’t do anything.

Also, I store a global configuration variable for my api’s URL, so I use url: config.apiUrl in my request options.

https://gist.github.com/ChrisFlannagan/e9e32428935076419f24aec6a30a7381

Saving The Image In PHP

So the config.apiUrl points directly to my php file (ex:server.com/apifile.php).  In this file you need to access file_get_contents(‘php://input’) to access the streamed data coming in.  This is how you work with forms submitted using content type “application/octet-stream” to get the file data.  With this data you can simply save it however you’d like using file_put_contents.  There’s other security concerns you will need to address that I’m not going over here as they are different all different applications of this process.  But here’s a quick, simple line for saving the image to a /uploads/ directory:

$all_headers = apache_request_headers();
$newimg = file_put_contents('uploads/' . $all_headers['File-Name'], file_get_contents('php://input'));

Now your image has been saved!

Additional User Data Needed

If you are storing this image and attaching it to a user or any other kind of data you can pass these as header fields just as you did the File-Name.  In your JS just under the line:

"File-Name": filename

Add a comma and put the next field you might need such as:

"File-Name": filename,
"Email-Add": email

Enjoy!

Touch “Hold” Function: Button Held Down In NativeScript

Tonight I needed to run a function constantly while a button is being held down in my app.  I found the gestures functionality and it had what I needed but I had to do some work to get it to perform what I was after.

My task was this, when someone puts their finger down on a ‘Record’ button I need to store what the sound level was every 10/1000 of a second.  So here’s what I did.

Using Gestures Touch to Define “Hold”

When the page is loaded I assign the button element to a variable then I add the on touch function.  It’s important to declare that button’s variable at the beginning of your JS so it’s available in all functions.  Also important to require your view module and gesture.  Here’s a snippet that covers all of that:

var viewModule = require("ui/core/view");
var audio = require("nativescript-audio");
var timer = require("timer");
var gestures = require("ui/gestures");
var documents = fs.knownFolders.currentApp();
var recorder = new audio.TNSRecorder();
var isRec = false;
var timeRec;
var currentRecording = new Array();
var page;
var soundlevel;

exports.loaded = function(args) {
    page = args.object;
    soundlevel = viewModule.getViewById(page, "soundlevel");

    soundlevel.on(gestures.GestureTypes.touch, function (args) {
        if(args.action == "down" || args.action == "up") {
            recordVolume( args.action );
        }
    });
}

Now that I’m calling a function, let’s tell that function what to do.  We have our “soundlevel” view which is just a button with id=”soundlevel” and we’ve assigned an action of “on” for it when gesture touch occurs.  The gesture touch passes args that include “action” as a property.  That property can be “down”, “up” amongst other things, but these are what we need.  So now let’s build a function to handle the hold.

function recordVolume(action) {
    var recorderOptions = {
        filename: documents.path + "/recording.caf",
        infoCallback: function() {
            console.log();
        },

        errorCallback: function() {
            console.log();
        }
    };
    if( action == "up" ) {
        recorder.stop();
        isRec = false;
        timer.clearInterval(timeRec);
    } else {
        recorder.start( recorderOptions );
        currentRecording = new Array();
        isRec = true;
        timeRec = timer.setInterval( function() {
            var barWidth = Math.round((160+Number(recorder.getMeters(0, "average")))/160*100);
            currentRecording.push(barWidth);
        }, 10);
    }
}

Note: barWidth is an integer I end up assigning as a percentage of the screen width.  This way I can give a visualization of sound level.

Here we check wether the action is up or down and do our desired functionality based on that.  If it’s “up” that means the finger has been lifted from the screen so we stop everything.

If the action is “down” that means the user has just pressed the button.  So we user the timer library and set an interval.  Basically every 10/1000 of a second we perform a calculation of the sound level and push that to our array of sound levels.  Now we can analyze that and do what we want to do!