Monitor Sound Wave Decibels While Recording on iOS

You’re going to laugh at this.  My brother-in-law, David, told me an app idea he wanted me to build YEARS ago.  I had only written one crappy Android app, but when you write an app people start throwing you their ideas like crazy.

His idea, it was funny, but it was beyond my ability so I never really got going on it.  Now that NativeScript is here and I’m spending more time in the app world I decided to give it a go.  His idea? RankMyStank…

Farts

He wanted an app where you fart into the phone and it ranks your fart based on an array of factors: Length, depth, variety, pitch and so on.  I’m still working out that algorithm…

What I love about this idea is it made me really dig into NativeScript and try to figure out how to make this happen.  So I found the plugin nativescript-audio.  This boasted the ability to record and playback sounds easily in NS.

At first I couldn’t get it to work, so I put the project to the side.  After I released my first app into iTunes recently I had learned so much more about the framework and decided to give it another go.

I got the plugin working pretty quick.  As I toyed with it I began to realize there was no way to track the sound wave or get any details about the structure of the sounds being recorded.  You could just record then play.

Contributing

I’ve always wanted to contribute to an open source project but never felt like I was talented enough.  As I dug into figuring out how to accomplish this task I realized if I could figure it out, I could probably add it to the plugin.  This was motivation.  So, I set forth on my venture and here’s what I figured out.

Native Functionality

The cool thing about NativeScript is that you have access to all the native functions of iOS and Android.  Usually you don’t tap into them because there is such a great library of plugins already.  And there’s no way I could build this plugin from scratch at this point so altering the nativescript-audio plugin was my best option.

Inside the nativescript-audio plugin is a directory called src/ios/ and in here you find the functionality that communicates with the iOS native functions for audio.  The file recorder.js was my best bet so I popped it open.  There I saw:

TNSRecorder.prototype.start = function (options) {

As well as

TNSRecorder.prototype.stop = function () {

Amongst others, these guys told me that I found the spot where the functions I’ve been using in my javascript code to use this plugin were being defined.

Monitoring Recording

So I spent quite some time learning about the class I saw being used here: AVAudioRecorder.  This is the iOS class used to record sound.  I found out exactly how to use it to get the dB of sound waves being recorded in real time.  The function is called averagePowerForChannel() though there is also peakPowerForChannel().  From what I understand averagePowerForChannel() is closer to what the human ear hears so I went with that.

I also discovered that in order to use these functions you you must turn metering on.  It’s processor intensive so it is not on bey default.  In the end, this is all the code I added to the plugin to give us two new functions… one to detect if recording is happening and one to get us the current dB of sound being recorded.

TNSRecorder.prototype.isRecording = function () {
    var _this = this;
    return _this._recorder.recording;
};
TNSRecorder.prototype.getMeters = function (channel) {
    var _this = this;
    if (!_this._recorder.meteringEnabled) {
        _this._recorder.meteringEnabled = true;
    }
    _this._recorder.updateMeters();
    return _this._recorder.averagePowerForChannel(channel);
};

I wound up not even using the isRecording function but I figured it could be useful for others so I left it in after testing it.

Rewriting in TypeScript

So TypeScript is how the original plugin was built and it uses a compiler to create the .js files.  Now knowing this I had to write these functions in TS before submitting a pull request to the original plugin.  Fortunately that wasn’t too difficult.

public isRecording() {
  var _this = this;
  return _this._recorder.recording;
}

public getMeters(channel: number) {
  var _this = this;
  if(!_this._recorder.meteringEnabled) {
    _this._recorder.meteringEnabled = true;
  }
  _this._recorder.updateMeters();
  return _this._recorder.averagePowerForChannel(channel);
}

Using In NativeScript

So here’s what I have now just demoing the functions and showing they work.  I update a Label view’s width to show current dB coming in.  It’s fairly straight forward and a decent example of it’s use.

exports.onTap = function(args) {
    var recorderOptions = {
        filename: documents.path + "/recording.caf",
        infoCallback: function() {
            console.log();
        },
        errorCallback: function() {
            console.log();
        }
    };
    if( isRec ) {
        recorder.stop();
        isRec = false;
        timer.clearInterval(timeRec);
    } else {
        recorder.start( recorderOptions );
        isRec = true;
        timeRec = timer.setInterval( function() {
            var barWidth = Math.round((160+Number(recorder.getMeters(0)))/160*100);
            page.css = ".soundlevel { color:#FFF; padding: 10px; background-color: Brown; width:" + barWidth + "%; }";
        }, 10);
    }
}

Using update_option & get_option Instead of the Complicated Settings API in WordPress Plugin Development

IMPORTANT EDIT: Security is vital, and I’ve been called out by two very respectable WordPress engineers on Advanced WordPress for my lack of security in this post and that using the Settings API is important because it handles this security for you.  I’m adding nonce, capability checks and proper sanitization to this code right now and should be in place shortly.

The code in here is also written for brevity of example.  Copying and pasting will work but it’s best practice to put functionality in the appropriate places.  For example instead of just using sanitize( $_POST[‘var’] ) you should add a filter that’s global.


WOAH that’s a long title.  This isn’t going to be a crazy long post but all those items mentioned are very important to the content.  The WordPress Settings API is powerful and for large plugins or themes it might be the best way to go about managing a large array of settings and options.  But most of my plugins are small scale and I find it overly complicated and bulky.

My Experience With The WP Settings API

If you don’t care about my experience and just want to see my solution click here.

My first plugin where I needed a core admin page just for settings was the WP Name Your Donation plugin.  I’ve all but abandoned that plugin because there are so many awesome plugins out there that cover its functionality and more.  It was a great learning experience building it though.

It allows multiple gateway options for accepting user determined amounts of money, i.e. donations.  So the admin page needed to allow a user to set the api keys for multiple gateways and I was starting off with Stripe, Authorize.Net and PayPal.

Googling admin settings in plugin development while I was building this, which was only my second plugin, referred me to articles on the WP Settings API.  It took a TON of trial and error to get this functioning and I still don’t think it’s implemented right.  Take a look at this:

https://gist.github.com/ChrisFlannagan/5ed116c35b97b601fc6d26dcd7085bca

I start by building out all my options in arrays.  These arrays hold all the info for each setting input I will need for each payment method option.  Then I loop through them all using the Settings API method add_settings_field() after using the methods register_setting() and add_settings_section(), note this is in the admin_init hook:

https://gist.github.com/ChrisFlannagan/1cabe324b70ae0d18921d5277574e62a

I have different functions for different kinds of fields which you can see in the parameters of add_settings_field.

Codex Confusion

Over in the codex for the Settings API you will notice multiple times they have small callout notes saying “make sure this was done first.” The confusion is real because my code does not follow a lot of the directions yet it works.  But when I was playing with it last night in a new plugin I was following directions exactly and it wouldn’t work.  For example:

NOTE: You MUST register any options used by this function with register_setting() or they won’t be saved and updated automatically.

In my code you will see I use the register_setting method, but I use it with the parameters

( self::PLUGIN_ABBR . '-group', self::PLUGIN_ABBR . '-group' )

The PLUGIN_ABBR is just wpnyd so the string “wpnyd-group” is set for both parameters and here’s the kicker: I DON’T USE THAT STRING ANYWHERE ELSE IN MY SETTINGS CODE.  What the hell???  I look back at this and wonder what the hell brought me to the code that’s in place and that works.

I’m not going to expand on this too much but will in comments if we have discussion.  This is just one example of my insane confusion from trying to implement the Settings API for the second time and trying to actually follow directions.

Using update_option and get_option For Admin Settings in a Plugin

These methods are lightweight and serve a simple but awesome purpose.  You set a unique key and a value and those are accessible at any time.  I find it best just to learn by example so I will show what I recently did and explain along the way.

I need the ability to let an admin set a few checkbox options and a color.  For simplicity’s sake in this post I’ll show how I do that with just one checkbox and a text field (I use a color picker but that makes it complicated, so we will just use text).

Here’s the full code, explanation below that:

https://gist.github.com/ChrisFlannagan/26264438230bad687680c8cf61a8f5fa

Let’s look at the form first.  We have two inputs, feature_on and settings_color, a checkbox and a text input respectively.  These represent two settings we want the admin to be able to control.

Now let’s look at the php up top.  The first thing I do is set a default value $settings_color which will be used in case this has not been set by the admin yet.  Then I check if the form has been submitted by detecting if $_REQUEST[‘settings_color’] is set.  If it is, let’s update some settings.

The first method we use is the WordPress method update_option().  I love this method.  If the option doesn’t exist, it creates it, if it does exist then it simply updates it! So simple, so straight forward, so not messy, YES.

NOTE: Option keys MUST be unique so be carful naming as you don’t want to overwrite an option in another plugin.  Here I added “myplugin_” to the beginning but I’m sure you can be more creative than that.

Setting & Getting Text Input Values

This is so straight forward.  First thing we do after checking if the form was submitted is simply set the options value with the (sanitized) submitted value:

update_option( “myplugin_settings_color”, sanitize_hex_color( $_POST[‘settings_color’] ) );

Done! Now we can call this value and use it, overwriting our default set value with:

if( get_option( “myplugin_settings_color” ) !== false ) {
$settings_color = get_option( “myplugin_settings_color” );
}

We must check if the admin has already set this or not by testing if it exists via the !== false or we will throw a php warning.

Sanitizing with pre_update_option

It’s important to sanitize any posted data going into your database.  For options we use pre_update_option filter.  To use this you need to add your option’s key to the end of the filter.  So for my settings_color option it would be like this:

add_filter( 'pre_update_option_settings_color', array( &$this, 'hexcolor_sanitize' ), 10, 2 );

Then a function ‘hexcolor_sanitize’ needs to be defined for handling this.  In this code example below you will see how that is handled.  Side note, sanitize_hex_color is not available outside of the customizer so I just copied the function into my plugin’s code:

https://gist.github.com/ChrisFlannagan/ce8c3152552e7156ad2c892bcc7e85cb

Setting & Getting Checkboxes

If a checkbox is checked when a form is submitted then it’s value is accessible via $_REQUEST[‘checkbox_name’].  If it is NOT checked, then that request variable is not set at all.  So if we don’t need a value from it but simply need to detect if it’s checked or not we just see if it exists:

if( isset( $_REQUEST[feature_on] ) ) {

For my purposes this is all we need so we update our option to either true or false.  Now if we want to set the box to checked or unchecked in the admin interface based on what an admin has or has not set already then we need to check a couple of things.  Has this setting been set previously? If so is this setting true or false? We accomplish this with:

if ( get_option( “myplugin_feature_on” ) !== false && get_option( “myplugin_feature_on” ) ) {
echo ‘checked=”checked” ‘;
}

Conclusion

The purpose of this article isn’t to make the Settings API look like a bad choice.  It’s extremely powerful and a great choice for many applications.  But for simple plugins like mine it’s overkill.  And I will say this, the codex and documentation on the Settings API are fucking horrible and confusing.

My First WordCamp Presentation Was Awesome

I’m sitting in a tattoo parlor in St. Louis right now waiting on the artist to sketch up my art.  I love tattoos, I love getting them, I love appreciating other people’s, I can’t get enough of them.  I get tattoos to memorialize events in my life.  I get them for other reasons too but that’s a big one.  I decided to get one that represents my experience this weekend.

haildale-shamrockI’m on stage all the time with my band.  We’ve played in front of 500 people and I didn’t have a single butterfly.  But the day before doing my first WordCamp presentation I was nervous as hell.  I was terrified honestly.  I’ve never spoken as an expert.  I’ve never considered myself an expert.  I was encouraged by my piers to apply for speaker positions though so I decided why not and sent out a few applications.  To my surprise three got back to me and I was actually doing it.

I spoke on Plugin Development 101.  It was a basic introductory to how plugins are built in WordPress and how simple it is to actually make one.  The end of the presentation I build a plugin in just a few minutes to demo the simplicity.  The slides can be found here: http://whoischris.com/slides/plugin-dev-101.pdf

When I got to the conference and was setting up my computer with the projector I felt a lot calmer.  There were only two people in there.  As much as I wanted to have a big group, my nerves were very happy at the tiny turn out.  I was supposed to start at 9, but decided to wait a couple minutes to see if anyone else showed up.  By 9:04 every seat in the room was filled… shit.

I kept my composure and just went at it, started talking, introduced myself and went slide by slide.  I was fast, and I probably rushed a couple of slides because I was finished in 25 minutes when it was supposed to be 40 minutes with a 5 min q & a.  Thankfully everyone seemed to really enjoy it and there were loads of questions to fill the remaining time.  We had an awesome discussion overall and I think people really got some good stuff out of it.

So in a few minutes the tattoo artist will be back to get me.  I’m getting an old school radio microphone with WCSTL in red lettering above it.  I added a pic below, skin is swollen, pink and twisted a little weird, it looks really good though and can’t wait for it to heal.

Up next, June 4th in Asheville, I’ll be presenting on leveling up as a developer.

wcstl

Full Screen jssor Slider Exact Window Width & Height

I’ve been working on a program for my side job that is supposed to have lots of slider like features between content with LOTS of content.  My favorite slider libray, because it’s got SO much functionality for devs is jssor.

One thing I could not find a proper solution for was making a full screen slider that would work on any screen or device (with a modern browser).  So, I thought and thought and came up with a solution.

So there’s no way to set jssor height by percentage or parent height and keep the width proportional.  I tried everything I could but it absolutely must be pixels.  There are some options that set it but the width is then off.  Seriously, I tried everything.

So What If We Set It By Pixels?

I mean, it is a php site.  So I came up with an interesting solution.  It’s not bullet proof, especially if the user resizes the window, but it works.

My php starts with this:

session_start();
if( isset( $_REQUEST['wslides'] ) ) {
   $_SESSION['wslides'] = $_REQUEST['wslides'];
   $_SESSION['hslides'] = $_REQUEST['hslides'];
}
if( !isset( $_SESSION['wslides'] ) || isset( $_REQUEST['reset'] ) ) {
   header( "Location: set-dimensions.php" );
}

Here we start a session, then, we see if there’s a query variable called ‘wslides.’  If there is, then we have ‘wheight’ too and we know what pixels to set for our slider.  Bam!

So How Do We Get Those Pixel Dimensions?

Look at the next ‘if’ statement.  If we don’t have a session set for width and height we forward to a page called ‘set-dimensions.php’.  Here’s the full code of that page:

<html>
<head>
   <title>Loading</title>
   <script language="javascript" type="text/javascript">
      window.location.href='index.php?wslides=' + window.innerWidth + '&hslides=' + window.innerHeight;
   </script>
</head>
<body></body>
</html>

It’s just used to set dimensions of window very fast then send back with the query variables.  Now we can build our slider to the window’s width!

<div id="slider1_container" style="position: relative; top: 0px; left: 0px; width: <?php echo $_SESSION['wslides']; ?>px; height: <?php echo $_SESSION['hslides']; ?>px;">
 <!-- Slides Container -->
 <div u="slides" style="cursor: move; position: absolute; overflow: hidden; left: 0px; top: 0px; width: <?php echo $_SESSION['wslides']; ?>px; height: <?php echo $_SESSION['hslides']; ?>px;">
  <div id="slide-welcome">hello</div>
  <div id="slide-goodbye">goodbye</div>
 </div>
</div>

Block & Disable All New User Registrations & Comments Completely

I have one website that must have some malicious back door in the theme or plugins.  I don’t use the site much and haven’t maintained it well but this is also not the first time I’ve had comments turned off and anyone can register turned off and STILL got flooded with spam accounts and (unapproved) comments littering my database.  This plugin removes the ability to register or comment completely, back doors and all.

Edit: Now live in WordPress.org Repo: https://wordpress.org/plugins/block-disable-all-new-user-registrations-comments-completely/

Feel free to try it out here: http://whoischris.com/DABARACC.zip

Download Raw HTML Form Importer for Gravity Forms BETA

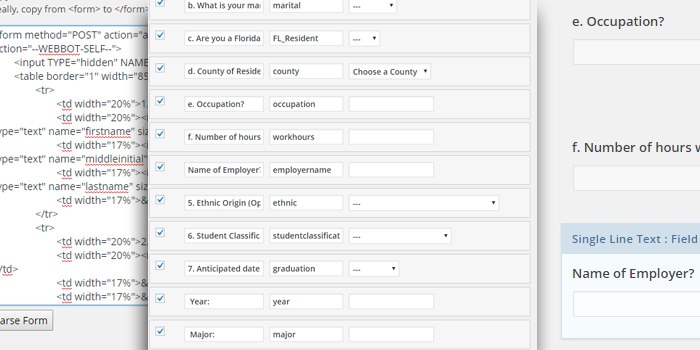
It’s working well from what I can tell.  I’ve added a couple of small features such as setting name and description and the ability to copy the input fields name to the label.  I have not got the radio button import yet… feel free to try it out!

http://whoischris.com/better-html-form-importer.zip

It’s Alive! Importing Raw HTML Forms into Gravity Forms

I was inspired to do this project because my job at USF Sarasota-Manatee requires moving old code over to WordPress.  We have a very large legacy site that has loads of hard coded, sloppy HTML, so moving it hasn’t been easy.  One of the worst parts is the long forms which there are still a few lingering.  So I had an idea and it is actually working.

Our system is moving to Gravity Forms.  As of now we have a mixture of google forms, hard coded forms and contact form 7 forms.  This tool should simplify centralizing them all into gravity forms big time.

In my previous post I had managed to create some results by scraping and pulling labels for the inputs that were pretty close.  I’ve formatted it into a proper plugin and at this point I’ve managed to get it importing into Gravity Forms.  Feels good, man.  Heck of a challenge, but nothing feels better than seeing your idea blossom into reality.  Feel free to take a look at the code and even try it out, it’s getting there but still a ways to go and many features to add.

https://bitbucket.org/MrFlannagan/better-html-form-importer