Simple Custom Settings Fields for Give WP Donations Plugin

My previous post about Give was an intro to building a payment gateway for the plugin.  If you’ve built extensions for Give or are starting to then you’ve probably run into the settings fields API for adding a variety of inputs.  The options are limited and there are often times a need for custom fields.

How Give’s Settings Fields Work

In the class file class-admin-settings.php located in give/includes/admin/ the function output_fields handles displaying different types of fields registered.  If you are here you probably know the standard format for adding a settings field in your code:

settings[] = [
   'name'    => __( 'Select an Option', 'my-text-domain' ),
   'desc'    => '',
   'id'      => 'select_box_1',
   'type'    => 'select',
   'options' => [ 'op1' => 'Option 1', 'op2' => 'Option 2' ],
]

That adds a select field with a couple options.

As you add settings to an array they will be displayed in the same order in a Give formatted html table.  It appears they were using CMB2 but have since deprecated it.  I’m not 100% sure but there are remnants of it in the plugin.

Creating A Custom Field

Within the output_fields function I mentioned above there is a switch statement on the field type.  This goes through all the type options default in Give and outputs the field content based on type.  After all the case type options the default is a sweet do_action( ‘give_admin_field_’ . $value[‘type’], $value, $option_value );  This is how you do what you want to do with a custom field.

One thing I really needed when building an extension was a way to have inter-woven sub headers for form options.  I could not find a way to just output a title.  The type field title that’s default to Give outputs the top of a table with it as it’s meant to be, that’s right, at the top lol.

Let’s start with an example of creating a simple sub title output.

https://gist.github.com/ChrisFlannagan/a2f89eef7b65f18bddd0de5987db61b0

Remember, the form settings fields are all in a table so you need to use a table row to output your field.  Now we can add this subtitle between fields by using:

$settings[] = [
   'id'   => 'my_settings_subheader_one',
   'name' => 'Custom Sub Header Section',
   'type' => 'my_custom_subtitle',
];

Voila! We have a custom field in Give settings.  The type is set to what comes after give_admin_field_ in the add_action of our sample.
Custom Give Settings Fields Subheader and HR
Here I have two custom fields, a subheader field and a horizontal rule field

Saving Custom Field Data

Saving is pretty straight forward as well.  The example below is kind of pointless as Give already has a text box type but it shows how you’d go about saving your data in a custom field.

The key is figuring out how to structure your action’s name.  Give uses the settings page followed by _save_ followed by the tab you are on.  Here’s their documentation on it followed by an example.

/**
 * Trigger Action.
 *
 * Note: action dynamically fire on basis of setting page slug and current tab.
 * For example: if you register a setting page with give-settings menu slug and general current tab name
 *              then action will be give-settings_save_general
 *
 * @since 1.8
 */
do_action( self::$setting_filter_prefix . '_save_' . $current_tab );

https://gist.github.com/ChrisFlannagan/36e235224bb135019424fc1eed2504db

Run A Quick, Local WP_Query Injection With A Closure Through Post Clauses Filters

We use the posts to posts (p2p) plugin a lot for building relationships between posts and post types. Occasionally you will have a query to get connected posts that will return multiple copies of the same post. So I worked out this method to handle that efficiently.

This method can be used for more than just query injections but that seems to be where I find myself doing it most. Sometimes you need a tweak to a get_posts or a new WP_Query but it’s so localized to the particular function it is in that it’s best to just take care of it there. No need to build out a class to handle it, just give this a shot.

Being Efficient

When coding, avoiding unnecessary sql queries and loops with conditionals is at the top of the list in keeping your site’s speed as optimized as possible. I had a query that was pulling in duplicate copies of posts thanks to the way p2p works. I could certainly just loop through the results and build a new array of distinct articles but that would be wasting processor power and making my query return far more than I needed.

I needed to do this right. So my thought was to filter into the query and adjust the sql before it ran. There’s a multitude of ways to do that but I also felt that this was so unique to this particular function that building out a class or a helper function to do it was unnecessary and would involve too much code for a simple task.

So the goal is to slap an sql clause filter on before the query and make sure that filter was removed before any other queries ran.

Choosing The Clause Filter

So the simplest filter would be to use ‘posts_distinct’ and return “DISTINCT.” This puts a DISTINCT string right after the SELECT statement. It works great for a typical query but when you have a complex JOIN query sometimes it just won’t work.

I toyed with the ‘posts_fields’ filter, but didn’t get far and never got the results I was after. I finally realized the sql I was invoking through p2p and WP_Query was needing a GROUP BY piece to group the results by post ID and remove duplicates.

function groupby( $groupby ) {
    global $wpdb;
    return "{$wpdb->posts}.ID";
}

Now I just needed to implement my filter somewhere.

Add Filter, Remove Filter

We need to make sure our filter only hits this single query we are running. What we can do is this:

  1. Build a closure: Assign a variable’s value a function to handle the groupby needs.
  2. Add a filter that executes our closure.
  3. Run our get_posts() or new WP_Query.
  4. Remove the filter.

It’s actually super simple and efficient. Here’s the code I used:

https://gist.github.com/ChrisFlannagan/73bf8b7c892a1e3106e8b16991875863

By adding the filter right before get_posts() and removing it right after we are making sure that filter only hits the query executed by get_posts().  Also, by storing the function as a closure in the $distinct_ids variable we are able to target it in our add_filter and remove_filter with ease.

WP_Query Filters

There’s a whole bunch of cool filters you can tap into to customize the sql query before it executes.

  • posts_fields – Filter the fields right after the SELECT of the query
  • posts_join – Filter the JOIN
  • posts_orderby – Filter the ORDER BY
  • posts_where – Filter the WHERE statements
  • posts_distinct – Use return “DISTINCT” to avoid duplicates (unless you have a situation like mine here).
  • posts_clauses – This one is awesome.  It passes in a single parameter which is an array of all the above and you can adjust them all in the same function.

This shit is really powerful and when you start reaching more advanced levels of WordPress development you’ll find yourself using them regularly.  Check out my co-workers blog post about building out a query for calculating distance between two geo coordinates.  This was what taught me a lot about this stuff and it’s really amazing.

Version 16.1 of WordPress PHP Info Released

I adopted this plugin a while back from a friend. It was closing in on 10,000 active installs and I thought might be fun to tinker with.  The code was pretty sloppy as it was from his younger days and he didn’t feel like maintaining it.

I took it over and didn’t do much with it.  I added a pretty crappy email the php info feature that didn’t really work well at all.  Still, people needed it and it was a first mover so it’s the go to phpinfo() plugin for people.

It hit 20,000 active installs just a few days ago.  Well I decided to spice it up a bit.  Over the past few evenings I rewrote it from scratch with much better code and WordPress standards.  I cleaned up the interface to be much nicer and fine tuned the email info feature to include multiple addresses and work securely.

Check it out here: https://wordpress.org/plugins/wordpress-php-info/

SNIPPET: Add an “Upgrade” Button To Item on Checkout in WooCommerce – Select Upgrade Product Per Product

This is JUST a proof of concept.  The code here is no where near ok for production.  I share as a snippet, use if/how you can.

https://gist.github.com/ChrisFlannagan/d7559c3682bc3db588cd9c6b70c01dec

Building a Payment Gateway for Give WP the Donation Plugin for WordPress

My father runs a non-profit organization and I told him I’d help with some of his online needs.  I’m in the midst of a task for him where I need a very simple, but precise method of donations through Stripe.  While the Stripe Add-On for Give is excellent, it’s more than I need and missing some small features my project requires.  I’m not going to get into that specific project but show you what I’ve learned.

Unless I’m missing something obvious on their site and with some quick googling, there’s no documentation for building Give gateways. I had to reverse engineer a couple that are available to see what is necessary to make it work.  Here it is in its simplest form.

Bare Bones Gateway

When building an extension for a plugin I like to try and build the absolute barest possible version.  What you see at the bottom of this section is just that.  We use just two hooks:

  • add_filter( ‘give_payment_gateways’ )
  • add_action( ‘give_gateway_{gateway_slug}’ )

The filter registers our gateway.  This will then show our gateway as an option in the Give gateway settings.

The action is where we process the submitted form data.  It’s pretty straight forward, the function has a single parameter ($purchase_data) passed to it which contains all data submitted and generated by Give that’s needed to process a donation.

The $payment_data array is created and built to hold all the necessary items for processing a transaction and recording it.  Then we simply call the Give function give_insert_payment( $payment_data).

https://gist.github.com/ChrisFlannagan/e214d5df8843e9125df14501907405b8

Settings

The next feature you will probably want to add is the admin settings for your plugin.  This will allow your users to set api keys and other various options you’d like to have.  You can see a good example of establishing settings here:

https://github.com/WordImpress/Give/blob/master/includes/gateways/offline-donations.php#L281

Pending Status

I tried using ‘publish’ instead of ‘pending’ in the payment data but this caused some php warnings to pop up.  Even though the donation went through, the results were ugly and obviously not to spec with the Give plugin’s functionality.  So after checking if the payment is valid simply run the give_update_payment_status function.  Or, if you need to verify the payment through your payment processor you can have  a separate function that handles this.

Fleshing It Out

This, as stated, is a completely bare bones gateway that does nothing but record a donation.  give_gateway_{plugin_slug} action is a blank canvas for handling processing.  You can do your own verifications, reach out to your processor, manage the response and more.  I would suggest looking at the Give plugin directory give/includes/gateways files offline-donations.php and paypal-standard.php and check out the different hooks and functions you can use to expand your gateway’s user experience and capabilities.

The Give plugin is very powerful and very extendable.

Import Leads From WordPress to Insightly with Caldera Forms & Insight.ly API v2.2

Recently I had a client ask to take submissions from a formsite.com form into their Insight.ly account as soon as submitted from their WordPress site.  This was no easy task as formsite uses javascript embedded code to generate an iframe and load the form.  I pulled it off by interfacing both the formsite api and the insightly api on a thank you page redirect from formsite but it was gross code and had a moderate failure rate at importing correctly.

Remove The Middle Man

Don’t let its modern, sexy homepage fool you, Formsite is pretty archaic in methods and form generation.  It’s a sad case a site and tool so large can be so crappy.  I needed to just build a form that shot the info over to insightly while also looking nice and sending an email to the site owner.

I’ve done some work for Caldera and I can honestly say they have the best, easiest to use and easiest to extend form building system for WordPress… bar none.  They also look gorgeous.  The drag and drop interface is beautiful and works flawlessly.  The options and extensions vary from simple needs to extremely complex ones.  What we are going to build here is somewhere in between.

Extending Caldera Forms

First build a form.  The Insightly API has some requirements but they are not documented well.  From trial and error I believe first name, last name and email are the main requirements… maybe phone.  So create a simple form in Caldera with these and whatever else you need then let’s move on.

Add the official Caldera plugin Caldera Forms Run Action to your WordPress installation.  This plugin allows you to to hook into the form data being processed before, during and after the processing.  Before we start writing code, let’s set that up on our form.

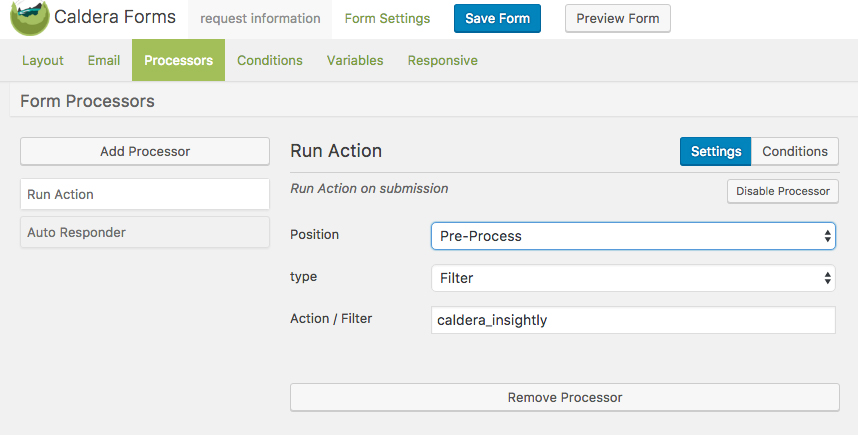
Go to the “Processing” tab on the form editing page, add a processor of type “Run Action” and fill in details like this.  You can use a different name for your filter/hook but just remember it when we start coding.

Run Action Processor Settings

We are saying we want to do some stuff with the form data after the user submits but BEFORE it gets processed.  This way if we have any trouble with the insightly api we can let the user know so they can fix their input.

Hooking Into Caldera

To do this, you need to put some code into WordPress.  You can do this in your theme’s functions.php file but I recommend you create a very small plugin.  To create this plugin you will add a folder to your wp-content/plugins directory called caldera-insightly.  Inside that folder you will create a php file named caldera-insightly.php.  That file will look like the below code.  Don’t forget to go to “Plugins” in your admin and activate it.

This code is BARE BONES.  I did not build this out like a big proper plugin but it’s simple in its functions and will work for the basics of interfacing the insightly API v2.2.  I explain the code below.

https://gist.github.com/ChrisFlannagan/d5e25d6c03ddef5ed92f3d99501be99b

The add_filter line is where we put in the hook that we registered on the Run Action processor on our caldera form.  The second parameter ‘process_insightly_data’ tells it what function to perform on the data from the form.  Remember this is all happening before Caldera processes the data so if we return anything at all from this function the processing fails and the user gets an error message.

$form_data[‘first_name’] is referencing the “slug” of the form field.  You can see this when building your form in caldera.  Each field input has a slug that is sent as the form data.

Insightly requires the data to be formatted in JSON with very specific keys.  You can see a list of options here.  The FIRST_NAME, LAST_NAME and so on are very straight forward.  The complicated shit happens when you hit the LEAD_SOURCE or want to do CUSTOM_FIELDS.  I’ve had a time and a half working with custom fields and got it to work once, so I just avoid it now if I can.  The lead source requires you to already have lead sources setup in insightly.  You need to get the ID’s of those sources and use them to create your lead source array.

Lead source is not required so you can delete that whole section if you want.

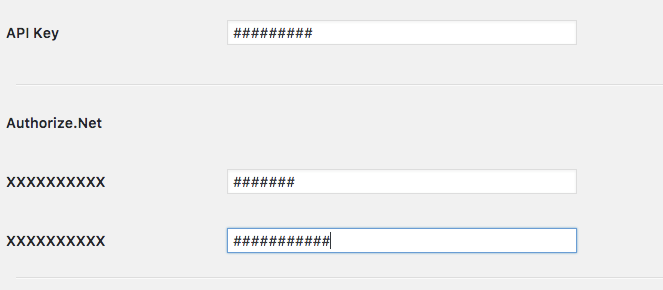
After building our array of data we json_encode it and send it on its merry way.  Don’t forget to grab your API key and replace it in this code.  To get that code once logged into insightly click your profile picture in the top right corner then hit User Settings.  Scroll down on that page and you will see API KEY at the bottom.

I detect for “LEAD_ID” in the return string as this means a new lead was created and assigned an ID.  If it’s not there then we return that an error has occurred.  This could be handled better but I was in a hurry as the client wasn’t paying for a lot of hours.

Yoast Primary Category Endpoint for the WP REST API

I had a special case today where I needed to pull in posts specifically from a Yoast SEO Plugin‘s primary category.  Yoast SEO allows you to set a single, primary category for a post in WordPress.  This is an awesome feature and very useful.

A site I’m building right now uses the API to pull in the latest articles of a category in a big drop down hero navigation system.  The thing is, just pulling from a category gets a lot of the same articles when clicking around the different category options.  We wanted to pull by primary category so each click gives a unique set of posts that are very relevant to the category option.

The Struggle

There may be a super simple way to do this already but I was seriously struggling googling for the answer.  I’ve done some extending of the WP REST API but I’m still a novice so I was hoping to avoid it.  But glad I didn’t because I learned a lot and I made a cool thing!

I couldn’t find a function in Yoast that pulled post IDs or anything based on a primary category.  I needed to figure out how they assigned this.  I dug through the database and found a post meta with the key ‘_yoast_wpseo_primary_category.’  This is it, this is what I’ll use to build my end point.

The Code

First we need to register our endpoint/route.  I prefer building things in classes so I created a class:

<?php
class Rest_Api_Posts_By_Primary_Category {}

I register the endpoint in the __construct() as so:

https://gist.github.com/ChrisFlannagan/a6f63a02ea16268a25bc5d386e9ac63a#file-primary-cat-part-1-php

SITE_PREFIX is something I set in my theme’s functions.php file.  You need a namespace here so make it unique based on your plugin or theme or site in general.

The callback function is where the magic happens.  In get_posts_by_primary_cat( $data ) we do a simple WP_Query that makes use of the meta_query ability.  The thing is, I need the children of categories too.  Here’s an example similar to what I’m dealing with.

Let’s say we have three categories and these categories are what we see in our navigation menu: Math, Reading, History

Then those categories each have two children: ###-Lessons, ###-Research

So our final category structure looks like

Math
 – Math-Lessons
 – Math-Research
Reading
 – Reading-Lessons
 – Reading-Research
History
 – History-Lessons
 – History-Research

If someone clicks Reading I want to load all posts that have a primary category of Reading, Reading-Lessons or Reading-Research… so I need the children.

In the function below you can see I run get_categories on the selected category withe parent argument assigned.  This gets me all the children.  I just need their ids and I need them in string format so I run a quick foreach loop.   I make sure to add the original parent id back to the new array too.  Then I run the WP_Query.

https://gist.github.com/ChrisFlannagan/a6f63a02ea16268a25bc5d386e9ac63a#file-primary-cat-part-2-php

At this point you could just return $posts->posts but I needed the featured image and only a few of the pieces like title, time and a link.  So I built out what I need and return that.

Conclusion

Now to use this we simply visit http://yoursite.com/wp-json/SITE_PREFIX/v1/yoastprimary/##-catid-## and replace ##-catid-## with the actual category number.  I could’ve just made this a static class now that I think about it but whatever, you must remember to initiate it to work.  So in your functions.php of the theme or somewhere in your plugin call $rest_api_primary_cat = new Rest_Api_Posts_By_Primary_Category();

This was easy to parse in my javascript and is running great.  Hope it helps someone! Here’s the full code:

https://gist.github.com/ChrisFlannagan/a6f63a02ea16268a25bc5d386e9ac63a#file-primary-cat-php

Remove the +Add New Category / Custom Taxonomy Link in WordPress

This post is more about custom taxonomies than it is adjusting category capabilities, but it’s  probably resolved the same way.   So i mention how I’d go about it after I explain what I’ve been doing.

I have a theme that has a custom post type called Members.  These members need to be attached to posts at the authors choice.  For instance, an admin is adding a new blog post.  There are three posts in the custom post type Members: John, Jack & Jill.  This post should be attached a Jill taxonomy/category.

I could solve this with a custom taxonomy, but I want the term options to be only what posts are made in Members.  Problem is, I don’t want the admin to be able to add new terms here.  So that big +Add New Category/Member link has to go.

I could do it with CSS but then someone smart could get around that.  I need it done server side.

Removing the Functionality

As far as I can tell there’s no filter to hook into and remove that feature.  It’s not an argument when registering a taxonomy so you can’t just re-register category or set it when creating a custom tax.

What you can set is what users are allowed to edit/add terms.  The long route would be creating a custom user role and assigning only them.  But I thought to myself, what would WordPress do if I just used a user role that doesn’t exists?  So I did this:

https://gist.github.com/ChrisFlannagan/4cd3bfd0e853cda3d3f7898c59428ac2

I set edit_terms and manage_terms to ‘god’ and voila! The option is gone!