Building an HTML Form Importer for WordPress

Git: https://bitbucket.org/MrFlannagan/better-html-form-importer

I was working on a project for work recently where I had to take an old, terribly-coded, ASP.NET processed HTML form and move it over to WordPress.  This thing had a lot of inputs, selects and such.  Did a quick search for a tool that might help simplify the process.  For one thing, it would save some real time and for another, I HATE doing monotonous tasks.

Well, I had no luck finding anything to help me so I thought, “What if I could build it?”  I love toying with building scrapers and parsers.  I knew this would be sloppy as every crappy HTML form has completely different code, different structures, different mark-up and more times than not broken HTML.

I sketched a few concepts and settled on something that would work with <div> layouts, <table> and whatever else.  Will it work perfect? I knew right away that was not the case, but if I could get 80%, hell 60% right on most then it would save some real time.  And if I built some tools to help simplify fixing the errors, well hell, we saving some serious time, baby!

So what I settled on was this:

  • Recursively loop through all nodes in a block of HTML using DOMDocument.
  • Save current element if it’s just text/characters.
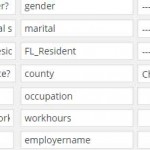
    This part gave me some issues.  I tried using preg_replace to remove all white space and detect if the element is a word but it just wasn’t catching them all.  So I decided to split the whole thing into individual characters.  If looping through encountered a character then it breaks and uses that node as the current element.  Basically this just bypasses any strange white space characters.

    if( 3 == $node->nodeType ) {
        $allchars = str_split( $nValue );
        foreach( $allchars as $achar ) {
            if( ctype_alnum ( $achar ) ) {
                $prevText = $nValue;
                break;
            }
        }
    }
  • If the element is a form input of some sort, create a label input with value of previous textual element (saved as current element in previous step), create an element name input,  and finally create a duplicate of current element with it’s value in a table row and display it.

This way every form element would be displayed with a label best guessing its previous label and allow that to be edited easily.  It would also display an editable field for the name of the element and one for its value.

So far, I’m really happy with the results.  (https://bitbucket.org/MrFlannagan/better-html-form-importer)

My plan is to finish all the different types of inputs (checkboxes, file uploads, etc.) and then add a way to drag and sort them, create additional elements and more.  I’ll give users the option to create a shortcode where they can display it, set if it emails/stores results in database and finally I’m hoping to make use of the Gravity Forms API and allow it to import there and other form plugins I can figure out.

Vagrant and VVV ,Win7 Command Prompt Scrolling, Errors, Problems and Fixes!

I’m gonna tell you guys something I’m a bit ashamed of: Up until today, when I work on a website, I upload the file to my staging server after every change then refresh the page to see my results. I’ve been doing web development, quite successfully, for 15 years now and I’ve never used a local environment to develop. I also switched from notepad to notepad++ only four years ago.  I just downloaded PhpStorm though, so watch out world! I’m getting crazy!

As I’ve grown in being a WordPress dev and just a better dev overall I’ve been making myself catch up with the times. Tonight I decided it’s time I install the Vagrant/VVV I’ve been hearing so much about. Would I jump off a bridge if all the successful WordPress devs did it? Probably, so why not jump into this as well.

I followed the tutorial at vagrantup.com for a few pages to get it installed, then I hopped over to the VVV github.com page to get that going. Basic steps to get started were pretty easy:

  1. Install VirtualBox & Vagrant
  2. Do the few Vagrant commands from the getting started page
    1. $ vagrant init hashicorp/precise64
      $ vagrant up
  3. I then ran the commands suggested on VVV
    1. vagrant plugin install vagrant-hostsupdater
    2. vagrant plugin install vagrant-triggers
    3. Go to my directory I created (C:/vagrant-projects) and run
      • git clone git://github.com/Varying-Vagrant-Vagrants/VVV.git vagrant-local
    4. cd to the vagrant-local directory and hit vagrant up.

Sweet!! Now I should be able to visit http://local.wordpress.dev/ to see some stuff.  Wrong.  “Connection Timeout.”  Checked my hosts file, wasn’t right so I manually added the hosts:

#VVV
192.168.50.4 vvv.dev local.wordpress.dev local.wordpress-trunk.dev src.wordpress-develop.dev build.wordpress-develop.dev

Had to be sure to run my text editor as Administrator so I could save the changes.

Still connection error.  So I’m trying to follow the output in command prompt from my vagrant up command it keeps scrolling and scrolling and I can’t see the problem.  I open up the VirtualBox GUI (Programs/Oracle/VirtualBox/) and see that the box is being started, running, and then just shuts down.

Well, turns out if you click the menu icon on the command prompt window you can go to properties > layout tab then up the screen buffer size from the default 300.  So I put it at 1000 then ran the vagrant up command again.  Then I saw it, permission error right before it shut itself down.  So I closed command prompt and reopened by right clicking and using “Run as Administrator.”

vagrant up

BOOM! Success!! So today I learned how to get vagrant running AND I learned you can scroll higher than 300 lines back into a command’s output history in command prompt.  I’d call it a successful day.

Now, back to work…

Vertically Align Elements Using CSS3 TranslateY

Saw an interesting post on reddit yesterday, it was in r/askreddit. The question was along the lines of “What question do you ask someone in your industry to immediately tell if they are faking it?” One of the higher voted comments was “How do you vertically align an element?” The answer was using transformY. I’ve seen a lot of methods that were ridiculous but it appears this is the common way to do it now. Using position you can set an element to 50% of it’s parents height but the axis is based on the top of the element. By adding a -50% transformY it will bump the element up so the middle is aligned to the middle of the parent. It’s beautiful!

This box is vertically aligned.
Can you tell?

<div class='tyex-container'>
<div class='tyex-valign'>
This box is vertically aligned.
Can you tell?
</div>
</div>
<style type='text/css'>
.tyex-container {
height:300px;
position:relative;
border:#ccc solid 1px;
}
.tyex-valign {
position:relative;
top:50%;
-webkit-transform:translateY(-50%); /* added prefixes, thanks @isotrope */
-ms-transform:translateY(-50%);
transform:translateY(-50%);
background:#ccc;
}
</style>

Simple Responsive Slider For Sliding Posts/Pages/Whatever Using the WP Rest API

I have a client that wanted their website to be primarily just the home page.  They also want mobile and tablet users to just be able to swipe through the pages.  I found some potential solutions but they were mostly very large, overly complex plugins for a simple need.  I’ve been wanting to dive into the WP API and I found this to be a great opportunity.  This is VERY basic usage of the WP API, but hey, I’m just getting started.  And please read to the bottom if you are knowledgeable of the WP API as I’m a bit confused on why something I tried did not work.

So here is my simple solution for the sliding pages (works for posts and other post_types as well).

JSSOR

First we need to include a slider library.  I went with JSSOR because it works great with loads of features and is easy to get started quickly.

http://www.jssor.com/development/

I enqueue this in my themes functions.php file

function theme_scripts() {
    wp_enqueue_script( 'jssor', get_template_directory_uri() . '/js/jssor.slider.mini.js', array() );
}
add_action( 'wp_enqueue_scripts', 'theme_scripts' );

build_sliders

Then we have our function for building the slider.  This can be tweaked to your liking, I wanted to have title, featured image and content.  We take in the slider id and height as parameters and we also take in the full url for the WP API request.  We format around the loop through our results with the required JSSOR slider containers.  The jQuery at the bottom is used to make the slider responsive.

/**
 * Build sliders
 */
 function build_sliders( $slider_id, $slider_height, $api_request ) {
 
	?>
	
'; echo '

' . $slide['title'] . '

'; if( $slide['featured_image'] ) { $thumbnail_id = get_post_thumbnail_id ( $slide['ID'] ); $thumbnail = wp_get_attachment_image_src( $thumbnail_id, 'full' ); echo '

'; echo $slide['content']; } echo '

'; } ?>

Finally we make a simple call to our function.  I placed this in the index.php file in my theme. It could easily be built into a plugin/shortcode.

I wanted pages from a specific page category (I used a plugin to add category options to pages: https://wordpress.org/plugins/add-category-to-pages/).

WP API Question

When first building this out I wanted to add the featured image src to the WP API response, I found a site through google that explains how to do it.  But for some reason I did not see any data labeled 'featured_image_thumbnail_url' when testing my api calls.  What gives? I used the code below in my functions.php file.

 function my_rest_prepare_post ($data, $post, $request ) {
	
	$data = $data->data;
	
	$thumbnail_id = get_post_thumbnail_id ( $post->ID );
	$thumbnail = wp_get_attachment_image_src( $thumbnail_id, 'full' );
	$_data['featured_image_thumbnail_url'] = $thumbnail[0];
	$data->data = $_data;
	
	return $data;
}
add_filter( 'rest_prepare_post', 'my_rest_prepare_post', 10, 3 );