I found all the articles and frameworks and this still took me quite some time to figure out. As far as I can tell this is easiest to do using Xcode 8. Some preliminary items you’ve probably already taken care of if you’ve found yourself here:
From what I can tell it’s not so important where this code is added but seems ideal to put it in the main page js file, the first that loads. You need to use an observable and bind it to your page. I had an app that was well into version 2 that I wanted to add push notifications to. It was setup as many examples are from a year or more ago using
exports.loaded = function(args) {
  main code here that is run when the first page is loaded
}
All the examples online use a main-page-view.js observable that’s instantiated in the other main js file and it’s all very complex. What it boils down to is you need to reference the main observable that’s being bound to your page in the var self = xxx line of the push notifications example code. In its shortest form you would do something like this:
What’s super import here is the var self = pageData. We are putting our observable into a variable called “self” that is used in the push notifications code from the readme.
I was just copying the code into my exports.loaded function and kept getting an error like self.set is not a function and was getting really irritated. So do what I did above or start a fresh project and copy from the sample push plugin repo here.
Getting Your Device Token
In order to test notifications you need to run your app on an actual device. So plugin your iPhone or iPad and get ready to run your app on it through either Xcode or tns command line. I always get confused on how to select the right device on command line so I just use Xcode.
You will also need to make sure you have all the example code in place for registering your device. I’ve built something you can copy here, just make sure that exports.loaded is initiated on the first page load. The main xml would look like this in the top tag:
I’ll also embed the full javascript sample code at the bottom of this post so you don’t have to click out of here.
Now you need to get your device token from your iphone/ipad which you will need to use in an app like Easy APNs Provider in order to send test notifications to your phone. I could not find any functionality in the nativescript plugin but on the link I shared earlier the fella shows how to do it in swift. These lines here:
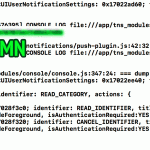
You can see the long ass function name there. I found that function in the nativescript plugin files in node_modules. So you need to temporarily edit (I know, I know) the file and add a console.log to it. In node_modules/nativescript-push-notifications/push-plugin.ios.js on, at least in the current version, line 41 you will see
var token = result.userInfo.objectForKey('message');
Under that add a console log:
var token = result.userInfo.objectForKey('message');
console.log(token);
Now when you run the app and accept the push notifications alert it will log in your terminal the device token. DO NOT FORGET to edit that console log out. Gotta keep them node_modules pure ya know.
Testing It Out
If you did everything right you can use the app I linked to earlier, Easy APNs Provider, and run some tests. It worked flawlessly for me once I got the code running. Good luck! Hit me up if you get stuck @ChrisFlanny. Here’s a full sample code for doing a simple implementation inside an exported function:
We use the posts to posts (p2p) plugin a lot for building relationships between posts and post types. Occasionally you will have a query to get connected posts that will return multiple copies of the same post. So I worked out this method to handle that efficiently.
This method can be used for more than just query injections but that seems to be where I find myself doing it most. Sometimes you need a tweak to a get_posts or a new WP_Query but it’s so localized to the particular function it is in that it’s best to just take care of it there. No need to build out a class to handle it, just give this a shot.
Being Efficient
When coding, avoiding unnecessary sql queries and loops with conditionals is at the top of the list in keeping your site’s speed as optimized as possible. I had a query that was pulling in duplicate copies of posts thanks to the way p2p works. I could certainly just loop through the results and build a new array of distinct articles but that would be wasting processor power and making my query return far more than I needed.
I needed to do this right. So my thought was to filter into the query and adjust the sql before it ran. There’s a multitude of ways to do that but I also felt that this was so unique to this particular function that building out a class or a helper function to do it was unnecessary and would involve too much code for a simple task.
So the goal is to slap an sql clause filter on before the query and make sure that filter was removed before any other queries ran.
Choosing The Clause Filter
So the simplest filter would be to use ‘posts_distinct’ and return “DISTINCT.” This puts a DISTINCT string right after the SELECT statement. It works great for a typical query but when you have a complex JOIN query sometimes it just won’t work.
I toyed with the ‘posts_fields’ filter, but didn’t get far and never got the results I was after. I finally realized the sql I was invoking through p2p and WP_Query was needing a GROUP BY piece to group the results by post ID and remove duplicates.
function groupby( $groupby ) { global $wpdb; return "{$wpdb->posts}.ID"; }
Now I just needed to implement my filter somewhere.
Add Filter, Remove Filter
We need to make sure our filter only hits this single query we are running. What we can do is this:
Build a closure: Assign a variable’s value a function to handle the groupby needs.
Add a filter that executes our closure.
Run our get_posts() or new WP_Query.
Remove the filter.
It’s actually super simple and efficient. Here’s the code I used:
By adding the filter right before get_posts() and removing it right after we are making sure that filter only hits the query executed by get_posts(). Also, by storing the function as a closure in the $distinct_ids variable we are able to target it in our add_filter and remove_filter with ease.
WP_Query Filters
There’s a whole bunch of cool filters you can tap into to customize the sql query before it executes.
posts_fields – Filter the fields right after the SELECT of the query
posts_distinct – Use return “DISTINCT” to avoid duplicates (unless you have a situation like mine here).
posts_clauses – This one is awesome. It passes in a single parameter which is an array of all the above and you can adjust them all in the same function.
This shit is really powerful and when you start reaching more advanced levels of WordPress development you’ll find yourself using them regularly. Check out my co-workers blog post about building out a query for calculating distance between two geo coordinates. This was what taught me a lot about this stuff and it’s really amazing.
I adopted this plugin a while back from a friend. It was closing in on 10,000 active installs and I thought might be fun to tinker with. The code was pretty sloppy as it was from his younger days and he didn’t feel like maintaining it.
I took it over and didn’t do much with it. I added a pretty crappy email the php info feature that didn’t really work well at all. Still, people needed it and it was a first mover so it’s the go to phpinfo() plugin for people.
It hit 20,000 active installs just a few days ago. Well I decided to spice it up a bit. Over the past few evenings I rewrote it from scratch with much better code and WordPress standards. I cleaned up the interface to be much nicer and fine tuned the email info feature to include multiple addresses and work securely.
My father runs a non-profit organization and I told him I’d help with some of his online needs. I’m in the midst of a task for him where I need a very simple, but precise method of donations through Stripe. While the Stripe Add-On for Give is excellent, it’s more than I need and missing some small features my project requires. I’m not going to get into that specific project but show you what I’ve learned.
Unless I’m missing something obvious on their site and with some quick googling, there’s no documentation for building Give gateways. I had to reverse engineer a couple that are available to see what is necessary to make it work. Here it is in its simplest form.
Bare Bones Gateway
When building an extension for a plugin I like to try and build the absolute barest possible version. What you see at the bottom of this section is just that. We use just two hooks:
add_filter( ‘give_payment_gateways’ )
add_action( ‘give_gateway_{gateway_slug}’ )
The filter registers our gateway. This will then show our gateway as an option in the Give gateway settings.
The action is where we process the submitted form data. It’s pretty straight forward, the function has a single parameter ($purchase_data) passed to it which contains all data submitted and generated by Give that’s needed to process a donation.
The $payment_data array is created and built to hold all the necessary items for processing a transaction and recording it. Then we simply call the Give function give_insert_payment( $payment_data).
The next feature you will probably want to add is the admin settings for your plugin. This will allow your users to set api keys and other various options you’d like to have. You can see a good example of establishing settings here:
I tried using ‘publish’ instead of ‘pending’ in the payment data but this caused some php warnings to pop up. Even though the donation went through, the results were ugly and obviously not to spec with the Give plugin’s functionality. So after checking if the payment is valid simply run the give_update_payment_status function. Or, if you need to verify the payment through your payment processor you can have a separate function that handles this.
Fleshing It Out
This, as stated, is a completely bare bones gateway that does nothing but record a donation. give_gateway_{plugin_slug} action is a blank canvas for handling processing. You can do your own verifications, reach out to your processor, manage the response and more. I would suggest looking at the Give plugin directory give/includes/gateways files offline-donations.php and paypal-standard.php and check out the different hooks and functions you can use to expand your gateway’s user experience and capabilities.
The Give plugin is very powerful and very extendable.
August turned six months old today. My wife and I had planned a European backpacking trip about 2 years ago for our honeymoon. We were just about to get married but knew we needed to save for a proper honeymoon.
Well August surprised us when my wife found out she was pregnant about 7 months before we were scheduled to leave. So I pushed the plane tickets back 5 months from the original date and we decided we’d just take him with us, so we did! We decided to stay in Norway instead of country hopping, but there was a lot to see there so we were very happy with the trip.
Here he is after 23 hours of straight traveling on the way home by trains, buses and planes!
Preparation
We wanted to travel light, no checked luggage if possible. Our carry ons were pushing it but they let us take them. They were the rolling luggage with pop up handle that is iffy size for carry on. We were prepared to pay and check them but were seriously hoping to save those funds. They did not let us bring them back, they told us at the gate they had to be checked but they let us do it for free since we were that far along. Also, I think having a cute baby strapped to you gets you some favors.
We used a baby carrier, an ergo. Babies do really well in these things for extended periods of time, for the most part, I know all babies are different so take all our tips with a grain of salt.
We packed enough diapers & wipes to get there plus a couple days. Check out your destination before hand. If it’s a 1st world country, diapers are fairly abundant.
We took 3 bottles, he uses a special kind that simulates the boob flow as he nurses most of the time. We do supplement with formula so we brought some formula as well, enough for 3 or 4 days. We didn’t research this well and should’ve seen what brands are available in Norway. Some babies are fickle about their formula. We were fortunate he liked what we found there just fine.
RESEARCH store hours. Norway has some odd hours for their stores and we didn’t even think about the fact we were travelling over Easter and they shut DOWN on Easter big time. For days… (google booze laws too if you want to have some drinks on your trip, Norway surprised us with the crazy nanny state alcohol laws).
All the main grocery chains there (rema 1000, kiwi, etc.) carried baby supplies.
Bring any meds you might need… we didn’t. My wife caught an awful cold towards the end of our trip and we super lucked out that neither August nor I got sick as well cause we’d have no idea what meds a baby could have and finding an open pharmacy on Good Friday was a royal pain in the ass.
Challenges
Our son has been a bit spoiled with co-sleeping. We used airbnb’s for the most part and a hotel in one location. We brought a small packable walled baby bed that folds up. In the airbnb’s we left it in the bedroom and put him to bed so we could hang out in the living area.
The first night in a new place was always the same, he took and extra hour or more to get to sleep. But after that he adjusted well. In the hotel we put him in the bathroom… was quite funny sneaking in to take a pee as quiet as possible (my wife got good at toilet gymnastics to get the right angles for no splashing).
You can’t ride in cars without a car seat, don’t even think about how you can pull that off just plan around using busses, trains and plains. And babies ride for free! At least with Norwegian Air he did, I know some international make you buy them a seat.
I’m not sure if this is normal but our boy hates when you sit down with him in the carrier, so if it’s a 20-30 minute ride you will probably be standing in the train… which brings me to this point as well, you will be walking a LOT, like a whole lot, so make sure you are physically ready for that. And take a fitbit, you’ll be crushing all your friends on it.
Planes are the obvious big & scary challenge with an infant. We made a bit of a game plan and it worked well. We had a bottle full and ready for him to take right during take off as their ears can pop and chewing on something comforting helps them a lot.
We also kept him awake from his naps before the flight. He got pretty fussy but it paid off as he slept for the majority of the flights. Also, learn to relax. People expect babies to cry, it might be annoying but it’s going to happen so just do your best to keep them quiet and comforted but don’t lose your cool if the baby goes off some. Stay focused and do what you can to calm them down. If seat belts off, get up and walk around with them. Every tends to smile at the cute baby.
The relax thing is super important. After tons of walking and traveling for hours at points, you will be exhausted… so is baby! Stay cool, do your best to just comfort the child. Focus on the child as much as possible and not your own tiredness. Once the baby is calm, it’s like a huge cloud is lifted and everything else is easy.
The HOLY SHIT Moment
My wife looked at me while we were in Bergen and said, “Huh, my throat just got scratchy out of no where.” We both blew it off as transitioning from hot humid Florida to dry cold mountain climate. But it only got worse. My wife has athletic asthma so it’s never really life threatening but if she runs for 20 minutes or so she has to have an inhaler or her throat constricts and breathing gets tough.
Well, she got bad… real bad. She was coughing like crazy and having trouble breathing just from picking up our son. We gave it a day to see if it was nothing serious but it only got worse. So the second night of it she reached a point where she was about to have a panic attack and at 11:00pm on Good Friday or maybe the night before (point is nothing was open and we knew no one) she made a trip to the E.R. in Norway.
Here’s what really makes us frustrated about the whole thing. They drew blood, listened to her lungs and kept here there for a couple hours just for the doctor to say she has the “Norwegian Cold” and time is all she needs to fix it. She can get some over the counter cough medicine for some relief and hit her inhaler once every four hours. Well she’d hit it and feel ok for about 45 mins to an hour then back to misery and trouble breathing and panic attacks, etc.
When we got back to the states she went to her doctor today and they said it was incredibly serious viral issues on top of her asthma and she needs to be having nebulizer sessions four times a day amongst some other treatments and a steroid. Very irritating how nonchalant the doctor was to her, almost making her feel stupid for even coming in. That said, they didn’t bill us a dime so that’s cool.
Deal With It
The impression we got was just to deal with it, so we did. We got on a regiment of cough drops, some weak cough syrup (the nation bans anything like mucinex completely) and a little whiskey/lemon/honey at night all topped with her inhaler once every four hours.
I was stuck with full responsibility for our son. I carried him at all times, I changed him, she still nursed though but doing anything physical at all would get her crazy winded, coughing and breathing issues. (So yea, thankfully we had some good “mom & dad” time at the beginning of the trip).
The last few days we didn’t much walking, we were very fortunate that we got to explore Oslo and Bergen a LOT before this got serious. We spent four nights in Flam near the end of our trip where everything was within 100 yards or so from the hotel. It’s a quaint mountain town with beautiful sites surrounding it, perfect for the situation.
Simply Amazing
We wouldn’t take the trip back for anything. I never knew I’d be bonding so much with my son, I feel like I know and understand him at a completely new level. He’s amazing and so is my wife. We went through heaven and hell together and we are only stronger as a family unit because of that. I highly recommend taking infants on adventures with you, just a bit more laid back adventures, but still a big time.
Many of my blog posts begin from a discussion on reddit and this one is no different. Reddit users get upvoted for hoping internet ad companies have an “agonizing” starvation of revenue to put them out of business. I can’t even begin to explain how ludicrous this statement is without writing a full-on article, so here we go.
What Are Ad Networks
Let’s start by drawing a line in the sand. I need to make it very clear what I’m defending here is not the practice of stealing and selling user’s information in ways done by the NSA. I’m also going to avoid the new usage of this practice by ISPs, the people who sell you your connection to the internet like Comcast or Verizon.
I’m strictly talking about company’s like adroll or google’s adwords or Facebook’s internal ad system. Let’s start small in explaining how these work.
Example Usage
Say your dad decided to take his lawn maintenance business of 20 years to the next level. Instead of the word of mouth around town that’s built his clientele he’s ready to add three new trucks, drivers and a half dozen team members. He wants to branch out into the surrounding counties and set the base to grow even bigger. Marketing is going to be key.
He hires a local agency, they set him up with a new logo, some branding standards, a website and… that’s right, digital ad management. This shit is vital to a business these days, small or large.
The agency will use their network or networks of choice to run your dad some advertisements. He has no fucking clue what’s happening but he’s seeing the results. Look at that, he’s got some “conversions” and starts generating new business.
Conversions: When a person visits a website, most websites have a conversion goal for that person. This means, they want the user to do something. This could be making a purchase, signing up for a newsletter, reading a certain amount of pages or anything they decide is the goal for their website.
The Ad Networks allow the agency, or even you if you want to do it yourself, to build out some ads, select the target audience, and press the start button. Typically these ads have
A title: bolder, clickable headline ex: “Mac’s East Alabama Lawn Maintenance”
A description: Short two or three lines text describing the link “With 20 years of customer loyalty we branch out into the entire East Alabama region offering our services.”
Keywords: Some keywords you believe people might search that you’d like to see your ad show up on: “Lawn Maintenance, Grass Mowers, Established Businesses, Family Business” and so on.
Certain ads like banner ads let you have a picture attached and then there are far more options in the bigger providers like google adwords, stuff too complex to write out here.
The Ad Networks takes these ads and serve them through websites that CHOOSE to use that network to make money. These websites willingly install the ad network software to their website. Any website that has this ad network installed will have advertisements shown that the ad network thinks relate to their content and what their users would like to see. So Mac’s ad would maybe show up on a blog about lawn equipment or when people search google for “Lawn Service in East Alabama.”
Targeting
Now the part that people are getting pissed off about. How the FUCK does Facebook know I love Bill Murray so much that they give me t-shirt ads with his face on them? Damn them sending me ads related to my interests!
Here’s how, it’s not complicated. It’s brilliant, but it’s not complicated. Simply put, you do things on the internet related to your interests. If the websites you visit use the same ad network that ad network records your interests. They then serve you ads based on those interests. You know that Bill Murray fan page you were on that had a big Facebook “LIKE THIS ARTICLE” button? Yea, they installed Facebook’s code there so Facebook knows you visited it. The website CHOSE to give Facebook access to it’s users. You CHOSE to visit that website AND have a Facebook account.
Your web browser, what you are reading this in right now (most likely), has a feature called cookies. Most of your favorite websites would not function correctly without cookies. They are a small text file that your browser creates. That’s right, YOUR browser creates it based on YOU requesting a website that sends instructions back to your browser. They say, “Hey, here’s our cookie recipe you should bake this so you can feed us these delicious information cookies next time you visit.” Your browser can say “fuck off, I’m not making your cookies” or it can make them. Let me draw that out more clearly:
THE REQUEST: You type in https://facebook.com into your web browser. This is called a request. You are REQUESTING Facebook to send you it’s website. Facebook doesn’t have to. It can see the request is coming from your computer and say, “Hey, fuck this guy, send him a big picture of a middle finger” and that’s their right! They can serve whatever the fuck they want to! But they wanna make money so they send back some really useful shit you wanna see.
THE RESPONSE: Say it’s your first time visiting Facebook, they notice they don’t have any records of you visiting before and so they send you the main registration/login page. You fill out the form with your information, click the I Agree to their terms and conditions (this is important), then click the register button. When you click this button you are making another request, this time it’s a request with information attached that YOU GAVE THEM.
This response sends your browser a bunch of code, code that developers like myself write. It says here’s all the stuff to show the user, here’s how to lay it out to look pretty and here’s some things to do behind the scenes to make it all work right. That behind the scenes stuff includes the cookie recipe. You don’t have to accept cookies, you can turn these off in any web browser’s settings. Maybe they should be opt-in (you must turn on instead of off) but that’s a different debate.
The cookie instructions tell your browser to create a text file containing this information and make sure it can only be read by this website that’s asking you to create it.
Typically the cookie says something like “This guy has logged in already don’t make him write his password and stuff again when he visits.” It will contain your unique user ID so it can log you in automatically. It does something else too …
Tracking! Spying! ESPIONAGE!
Some fucking reddit user actually said it’s espionage then copied the dictionary definition. What a blow-hard, entitled little shit. Let’s say you visit helpmylawnlookawesome.com and that website has installed google adwords so they can make some money serving ads to you. That website installs some cookies to your browser saying you’ve been there. Google Adwords makes a cookie too because that website installed them and said they could.
Then you find yourself on another website that also has google adwords installed so they can make some money, lawntips.com (Just the tips!). Well they both have google adwords so it can see that you’ve been to both websites and it might serve you an ad for helpmylawnlookawesome.com while you are on lawntips.com because it knows you’ve already been to that website once so you have some interest.
I’m in Europe on vacation right now and for some reason this is the ad I got on my own site while here… targeting at its finest lol
Your Address
Even if you don’t have cookies turned on, every connection to the internet has a publicly available IP Address. This is like your mailing address in real life. It’s public, it’s always public. If you browse through a service that offers to hide your IP Address, guess what? That service can see your IP Address cause it’s public and you gave it to them by requesting their service.
It’s just some numbers like this 111.22.33.4. If you browse any website, any website on the internet, that website can see the request is coming from that address. You can’t mail a letter without a return address.
So when you decide to go to a website you are actively saying “Hi, it’s me, here’s my address will you return some content to it?” That’s all they get. They don’t get your name, they don’t get your child’s school, they don’t rent you fucking shoes, dude.
But if you give a website some of your information, or things you are interested in, that website has every right to record your IP Address along with the things you told it about you. If that website has an ad network installed, guess what. Yep, that ad network can store you IP Address along with that information. Then when you visit another site that has that network it has all your information from the other site because they BOTH USE THE SAME AD NETWORK.
This is how things magically appear relevant to you or from sites you visited on other websites. It’s not fucking espionage. It’s marketing, we’ve been doing it for centuries. If you collected all the mailed advertisements in the country you’d notice ads relevant to the population of a certain area are being sent. Old people neighborhoods get ads for hip replacements. That’s just how it works and has always worked. You wanna outlaw marketing? Be my guest but that’s gonna fuck up some serious balance of this day and age.
They Shouldn’t Share My Private Information
THEN STOP FUCKING GIVING IT TO THEM. You can turn off cookies, you can willingly not have a Facebook account, no one is making you create one! Also, no one fucking cares about you. They care about selling shit to you. It’s not like they are saying, “Oh, here’s Tom’s address, let’s go spy on his life and shit.” You’re not that important so get over yourself.
Free & Open
If you want to have a free and open internet that means people have the right to put ads on their website, they have the right to build systems that serve ads for the best return, they have the right to put whatever the FUCK they want on their websites.
And you have the right to block it! You can use an ad blocking system, though I think it kind of makes you an asshole, it’s your right! Hell, I use one for specific sites that bother the shit out of me with their ads (looking at you UltimateGuitar.com).
You also have the right to not use cookies or JavaScript though it’s going to make your web browsing experience a lot more boring.
You know what’s really incredible? Facebook is always listening to the microphone of your cell phone. You gave it permission to do that when you accepted its terms while installing its app. You can uninstall it though, isn’t that a novel idea? Oh wait, you deserve to use their multi billion dollar to develop app for free with no strings attached. (No you don’t).
At the end of the day, calling it espionage is dumber than shit. You entitled little fuckers that do that are morons. And wishing agony on a business for trying to make money is like wishing a rainbow not to be a rainbow any more (I am the mango!).
I have an app I’ve been developing for 10 months now. It’s been in the iTunes store since this past September. I’ve been rehashing how the photo capture and gallery system works for a couple of months now and kept having random crashes, or after releasing and testing the live version on my phone it would bugger out or act weird.
I noticed in the console I was getting a warning. It technically wasn’t breaking the app but I had a hunch it was causing the random freak outs.
CoreAnimation: warning, deleted thread with uncommitted CATransaction; set CA_DEBUG_TRANSACTIONS=1 in environment to log backtraces.
I tried googling a solution but it was way over my head and not really related to coding in NativeScript. So I google uncommitted CATransaction NativeScript. I found a thread on a repo that dealt with using a background http thread. My photo gallery was highly dependent on NativeScript Background HTTP plugin.
I tns plugin remove nativescript-background-http then tns add plugin nativescript-background-http and it installed version 2.5.1 which was released two weeks ago. Instantly that issue was gone and the photo section was running so much smoother.
I’m not sure what changed, but these plugin devs (the good ones at least) are on top of it. Get the latest versions of your plugins!
Recently I had a client ask to take submissions from a formsite.com form into their Insight.ly account as soon as submitted from their WordPress site. This was no easy task as formsite uses javascript embedded code to generate an iframe and load the form. I pulled it off by interfacing both the formsite api and the insightly api on a thank you page redirect from formsite but it was gross code and had a moderate failure rate at importing correctly.
Remove The Middle Man
Don’t let its modern, sexy homepage fool you, Formsite is pretty archaic in methods and form generation. It’s a sad case a site and tool so large can be so crappy. I needed to just build a form that shot the info over to insightly while also looking nice and sending an email to the site owner.
I’ve done some work for Caldera and I can honestly say they have the best, easiest to use and easiest to extend form building system for WordPress… bar none. They also look gorgeous. The drag and drop interface is beautiful and works flawlessly. The options and extensions vary from simple needs to extremely complex ones. What we are going to build here is somewhere in between.
Extending Caldera Forms
First build a form. The Insightly API has some requirements but they are not documented well. From trial and error I believe first name, last name and email are the main requirements… maybe phone. So create a simple form in Caldera with these and whatever else you need then let’s move on.
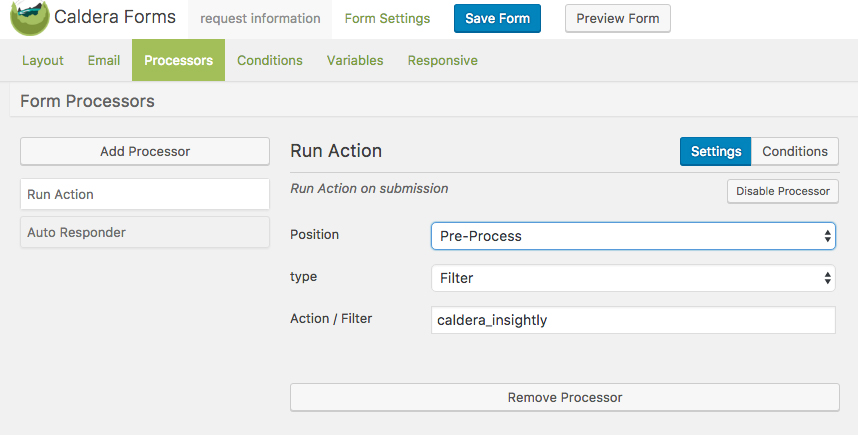
Add the official Caldera plugin Caldera Forms Run Action to your WordPress installation. This plugin allows you to to hook into the form data being processed before, during and after the processing. Before we start writing code, let’s set that up on our form.
Go to the “Processing” tab on the form editing page, add a processor of type “Run Action” and fill in details like this. You can use a different name for your filter/hook but just remember it when we start coding.
We are saying we want to do some stuff with the form data after the user submits but BEFORE it gets processed. This way if we have any trouble with the insightly api we can let the user know so they can fix their input.
Hooking Into Caldera
To do this, you need to put some code into WordPress. You can do this in your theme’s functions.php file but I recommend you create a very small plugin. To create this plugin you will add a folder to your wp-content/plugins directory called caldera-insightly. Inside that folder you will create a php file named caldera-insightly.php. That file will look like the below code. Don’t forget to go to “Plugins” in your admin and activate it.
This code is BARE BONES. I did not build this out like a big proper plugin but it’s simple in its functions and will work for the basics of interfacing the insightly API v2.2. I explain the code below.
The add_filter line is where we put in the hook that we registered on the Run Action processor on our caldera form. The second parameter ‘process_insightly_data’ tells it what function to perform on the data from the form. Remember this is all happening before Caldera processes the data so if we return anything at all from this function the processing fails and the user gets an error message.
$form_data[‘first_name’] is referencing the “slug” of the form field. You can see this when building your form in caldera. Each field input has a slug that is sent as the form data.
Insightly requires the data to be formatted in JSON with very specific keys. You can see a list of options here. The FIRST_NAME, LAST_NAME and so on are very straight forward. The complicated shit happens when you hit the LEAD_SOURCE or want to do CUSTOM_FIELDS. I’ve had a time and a half working with custom fields and got it to work once, so I just avoid it now if I can. The lead source requires you to already have lead sources setup in insightly. You need to get the ID’s of those sources and use them to create your lead source array.
Lead source is not required so you can delete that whole section if you want.
After building our array of data we json_encode it and send it on its merry way. Don’t forget to grab your API key and replace it in this code. To get that code once logged into insightly click your profile picture in the top right corner then hit User Settings. Scroll down on that page and you will see API KEY at the bottom.
I detect for “LEAD_ID” in the return string as this means a new lead was created and assigned an ID. If it’s not there then we return that an error has occurred. This could be handled better but I was in a hurry as the client wasn’t paying for a lot of hours.